How to Connect Inverter in Home
Power cuts affect not only your comfort but also your daily routine, work, and home security. That is why learning How to Connect Inverter in Home the right way is so important. A properly installed inverter does more than keep the lights and fans running during an outage. It also helps protect your home from electrical risks such as short circuits, overloads, and even fire hazards caused by wrong wiring or poor connections.
Correct installation also plays a big role in performance. When an inverter is properly connected, it operates more efficiently, delivers steady backup power, and helps extend battery life. This means fewer breakdowns, better energy use, and lower long-term maintenance costs.
In simple terms, an inverter is a key home power backup system that steps in when the main supply fails. In this guide, you will learn why proper installation matters and the essential points to understand before connecting an inverter at home.
Tools and Equipment Needed for Inverter Installation
Before you start any inverter installation at home, it is important to gather the right tools and components. A proper power backup setup depends not only on the inverter and battery, but also on the quality of the installation accessories. When you keep everything ready in advance, the process becomes safer, faster, and more organized.
Using the correct tools also helps reduce wiring mistakes, loose connections, and avoidable safety risks. This is especially important when dealing with battery terminals, live wires, and load connections. If you want to understand the basics before installation, read my article on how an inverter works.
Below is a simple, practical list of the tools and equipment you will need for a smooth, safe home inverter setup.
Essential Tools for Inverter Installation
These tools help you handle wiring, tighten terminals, check voltage, and complete the installation neatly.
- Screwdriver
A screwdriver is one of the most basic yet important tools for inverter fitting. You need this to tighten terminal screws, install panel covers, and secure wire connections. It is best to keep both flat-head and Phillips screwdrivers handy. - Pliers
Pliers are useful for gripping, twisting, bending, and cutting wires during installation. They give you better control when working in tight spaces and help make firm wire connections. - Multimeter
A multimeter is essential for checking voltage, current, and continuity. It helps you confirm whether the inverter input, battery output, and wiring connections are correct. This tool protects an extra layer of safety by helping you detect faults before switching the system on. - Wire Stripper
A wire stripper allows you to remove insulation from wires cleanly without damaging the conductor inside. This is important for making secure electrical connections and reducing the chance of poor contact or overheating. - Electrical Tape
Electrical tape is used to insulate exposed wire joints and improve safety. It helps protect the wiring from short circuits, dust, and accidental contact. For any home inverter wiring task, this is a must-have item.
Required Components for Inverter Installation
Along with the tools, you also need the main electrical parts that make the inverter system work properly. Choosing quality components improves efficiency, battery life, and overall system safety.
- Inverter Unit
This is the core of the home backup system. The inverter converts stored battery power into usable electricity for home appliances during a power cut. Make sure you choose the right inverter capacity for your home load requirements. - Deep-Cycle Battery
A deep-cycle battery is designed to provide steady power for longer backup periods. It is different from a regular battery because it can handle repeated charging and discharging. This makes it ideal for a residential power backup setup. - Battery Cables
Good-quality battery connection cables are essential for connecting the inverter to the battery. These cables should be thick, durable, and able to handle the current load without overheating. Poor-quality cables can affect performance and create safety issues. - Connectors
Connectors help create firm and reliable cable joints between the battery, inverter, and electrical line. Proper connectors reduce the risk of loose contact, sparking, and voltage drop. Always use compatible and heavy-duty connectors for better safety and performance. - MCB (Miniature Circuit Breaker)
An MCB protects the inverter system from overload and short circuits. The device automatically disconnects from the power supply when the current exceeds safe thresholds. This small component plays a major role in safe inverter installation and should never be skipped. If you’d like to learn more about miniature circuit breakers, you can explore our article “What are Miniature Circuit Breakers and How Do They Work?”
Do Not Ignore Electrical Safety Gear
While tools and components are important, electrical safety gear is just as necessary. When working with wires and battery terminals, gloves, insulated tools, and safety boots are essential for your protection. Even a simple home inverter connection can become risky if safety steps are ignored.
Why the Right Setup Matters
A good inverter installation is not just about connecting wires. It is about creating a safe, durable, and efficient home power backup system. The right tools help you work accurately, while the right components ensure smooth performance during power outages. When you invest in quality materials from the start, you reduce maintenance issues and improve the life of your inverter battery system.
Safety Precautions Before Installation
Before you begin any home inverter setup, focus on electrical safety first. A small mistake during installation can lead to shocks, wiring damage, or battery-related risks. Taking a few basic steps before starting can make your inverter installation much safer and smoother. Also, you can read my article on how an inverter works if you want to understand the system better before installation.
1. Turn Off the Main Power Supply
Always switch off the main power supply or mains switch before touching any wire, terminal, or connection point. This is the first rule of inverter setup safety, and one of the best ways to avoid electrical shock.
- Cut power from the main distribution board
- Double-check that no current is flowing
- Use a tester or multimeter before handling wires
This step also supports short circuit prevention, especially when you are working near existing home wiring.
2. Wear Protective Gear
Never handle inverter wiring or battery terminals with bare hands. Proper safety gear protects you from sparks, acid exposure, and accidental contact with live parts.
- Wear rubber gloves for insulation
- Use safety goggles to protect your eyes
- Avoid loose clothing while working near cables and terminals
These simple precautions are often ignored, but they matter a lot in safe inverter installation.
3. Ensure Proper Ventilation
The installation area should have good airflow, especially if you are using a lead-acid battery. During charging, batteries can release gases that may build up in a closed room.
- Place the inverter and battery in a well-ventilated space
- Avoid tight, sealed, or overheated corners
- Keep the area dry and clean for better battery maintenance
Good ventilation improves safety, supports battery life, and reduces the risk of gas buildup during regular use.
Step-by-Step Guide to Connecting an Inverter in Home
A home inverter significantly reduces the stress caused by power cuts. It keeps essential appliances running, protects your daily routine, and gives you peace of mind during outages. But for safe, reliable performance, the setup must be done correctly. If the wiring is loose, the battery is connected incorrectly, or the installation area is unsuitable, your home power backup system may not work properly and could even pose safety risks.
This step-by-step guide explains how to connect an inverter in the home clearly and practically. You will learn how to choose the right spot, connect the battery, link the inverter to the main supply, test the setup, and power it on correctly.
Step 1: Choose the Right Location
The first step in inverter installation at home is choosing a safe, suitable place. This is more important than many people think. A poor location can affect battery life, inverter efficiency, and overall electrical safety.
Keep the Area Dry and Clean
Always place the inverter and battery in a dry area. Moisture can damage internal parts, cause rust, and increase the risk of short circuits. Avoid placing the unit near water sources, damp walls, or open windows where rainwater may enter.
A clean area also helps. Dust and dirt can build up around cooling vents and terminals over time. This may reduce performance and increase maintenance needs.
Ensure Proper Ventilation
A well-ventilated area is essential, especially when using a lead-acid battery. During charging, some batteries release gases. Good airflow helps prevent heat buildup and improves the safety of the battery backup system.
Choose a space that:
- Has enough fresh air
- Is away from direct sunlight
- Does not trap heat
- Has room around the inverter for cooling
Keep It Away from Children and Pets
For better electrical safety at home, install the inverter in a place where children and pets cannot reach it easily. Battery terminals, cables, and power connections should not be left exposed in a busy household area.
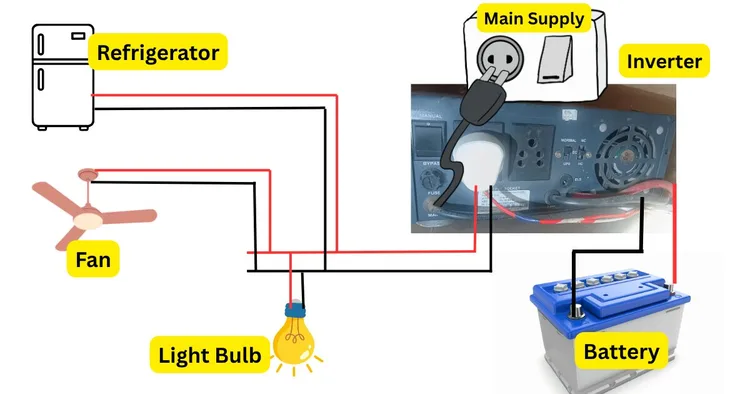
Step 2: Connect the Battery to the Inverter
Once the location is ready, the next step is to connect the battery. This is a key part of any inverter battery connection process, so do it carefully.
Identify the Positive and Negative Terminals
Every inverter and battery has marked terminals:
- Positive terminal: usually marked with a +
- Negative terminal: usually marked with a –
Before connecting anything, confirm the terminal markings clearly. Mixing them up can damage the inverter and battery and may create a serious safety issue.
Attach the Cables Securely
Use the correct battery cables for inverter connection. The cables should be strong, properly insulated, and suitable for the load. Connect:
- The positive battery terminal to the positive inverter terminal
- The negative battery terminal to the negative inverter terminal
Tighten the connections properly so the terminals do not become loose. A loose connection can lead to sparking, voltage drop, overheating, and poor backup performance.
Check for Clean Terminal Contact
Before tightening the cables, make sure the battery terminals are clean. Dust, corrosion, or residue on the terminal surface can affect current flow. Clean contact points help the power backup inverter work smoothly and improve charging efficiency.
Step 3: Connect the Inverter to the Main Power Supply
After the battery is connected, the inverter must be linked to the home’s main electrical system. This step should be done with extra care because it involves your house wiring and incoming power.
Use Appropriate Cables and Wiring
Use proper inverter wiring cables that match the inverter capacity and load requirement. Low-quality or undersized wires can heat up and become unsafe. Good cables support stable performance and reduce power loss.
This connection usually links the inverter to:
- The main power input
- The output line for selected home appliances
- A protection device such as an MCB or fuse
Follow Safe Wiring Practices
Before connecting the inverter to the main supply, make sure the main power is turned off. This is one of the most basic and important electrical wiring safety rules.
While doing the connection:
- Keep the wiring neat and organized
- Avoid exposed copper ends
- Use insulated connectors
- Make sure each terminal is fixed firmly
A correct home inverter wiring setup helps the system switch smoothly during a power cut and supports better long-term reliability.
Connect Only the Required Load
Do not connect the inverter to every appliance in the house unless the system is designed for it. Usually, a home inverter is used for essential loads such as:
- Lights
- Fans
- Wi-Fi router
- TV
- A few small appliances
This improves backup power efficiency and prevents overload.
Step 4: Test the Connections
Before switching the inverter on, take time to test everything. This step helps you catch small mistakes before they turn into bigger problems.
Check the Voltage
Use a multimeter to check the battery voltage and confirm that the inverter is receiving proper input. This is a smart and simple part of any inverter connection guide.
Voltage testing helps you verify:
- The battery is charged properly
- The polarity is correct
- The wiring is functioning as expected
If the readings are unstable or unusual, stop and inspect the setup again.
Inspect Terminal Tightness
Gently check all cable ends, terminal screws, and connection points. They should feel firm and secure. If a terminal is loose, tighten it before turning on the system.
Loose connections can cause:
- Sparks
- Heat buildup
- Charging problems
- Low backup output
Look for Visible Safety Issues
Take one final look at the installation area. Make sure:
- No wire insulation is damaged
- No metal object is touching the battery terminals
- No cable is bent too sharply
- The inverter is placed on a stable surface
This final inspection improves safe inverter installation and reduces future maintenance issues.
Step 5: Power On and Configure the Inverter
Once the full setup has been checked, you can switch on the inverter and complete the basic configuration.
Turn On the Inverter
Power on the inverter using its main switch or control panel. Most units will show status lights or a display screen. Watch the indicators carefully during startup.
Check whether:
- The unit turns on normally
- Charging mode is active
- No error light is showing
- Backup output is available
If the inverter does not start correctly, turn it off and inspect the battery connection and main wiring again.
Adjust Basic Settings
Some modern inverters allow you to configure settings such as:
- Battery type
- Charging mode
- Input voltage range
- Backup priority
Use the manufacturer’s settings guide if needed. A properly configured system can improve inverter performance, charging speed, and battery life.
Test Backup Operation
Now simulate a power cut by switching off the main supply. This helps confirm whether the inverter takes over properly. Check a few connected appliances, such as lights or fans, to ensure the home UPS system is working as expected.
If everything runs smoothly, your inverter setup is ready for daily use.
Common Mistakes to Avoid During Inverter Connection
Even a simple inverter setup for the home can go wrong if basic precautions are ignored. Avoid these common mistakes:
Reversing Battery Polarity
Connecting positive to negative by mistake can damage the system instantly.
Using Poor-Quality Cables
Cheap or thin wires may overheat and reduce efficiency.
Installing in a Closed Space
Poor ventilation can lead to heat buildup and battery-related risks.
Overloading the Inverter
Connecting too many appliances can reduce backup time and strain the unit.
Skipping the Testing Step
A quick test can save you from future faults and unsafe operation.
Tips for Efficient and Safe Inverter Use
Installing a home inverter is only the first step. To get reliable backup during power cuts, you also need to use it correctly. Good inverter care improves backup efficiency, supports long-term performance, and helps you avoid common safety risks at home. Small habits such as checking the battery, choosing a safe location, and protecting connected appliances can make a big difference over time.
You can also explore power backup options for home if you want to compare different backup solutions for your household needs.
1. Regularly Check and Maintain Battery Health
The battery is the heart of your inverter system. If the battery is weak, damaged, or poorly maintained, the inverter will not give proper backup when you need it most. That is why regular battery maintenance should never be ignored.
Check Distilled Water Levels
If you are using a lead-acid inverter battery, check the distilled water level from time to time. Low water levels can affect battery charging, reduce backup time, and shorten battery life. Always use only distilled water, not normal tap water, because impurities can damage the battery internally.
A simple monthly check can help you:
- Maintain proper battery function
- Improve charging efficiency
- Support better backup during outages
- Extend battery lifespan
Be careful not to overfill the battery. Follow the recommended level marks provided by the manufacturer.
Clean Battery Terminals
Battery terminals can collect dust, corrosion, or white deposits over time. Dirty terminals can weaken the connection between the inverter and the battery, potentially affecting charging and power flow. Applying petroleum jelly to battery terminals is a common practice. It helps prevent corrosion by creating a protective barrier against moisture and air, ensuring better electrical conductivity and prolonging the life of the terminals.
For better electrical safety, switch off the system before cleaning. Use gloves and clean the terminal area gently with a dry cloth or a suitable cleaning solution if needed. After cleaning, make sure all connections are tight and secure.
Watch for Warning Signs
Do not wait for a full battery failure. Keep an eye on early signs such as:
- Reduced backup time
- Slow charging
- Swollen battery body
- Unusual smell
- Frequent inverter beeps or alerts
These signs often point to poor battery condition. Quick attention can prevent bigger repair costs later.
2. Avoid Placing the Inverter Near Flammable Materials
Safe placement is one of the most ignored parts of inverter use. Many people install the inverter wherever there is empty space, but location matters a lot for electrical safety and fire prevention.
Keep It Away From Flammable Items
Never place the inverter near:
- Curtains
- Paper stacks
- Wooden storage boxes
- Paint cans
- Gas cylinders
- Cleaning chemicals
- Cloth piles
Inverters and batteries can generate heat during charging and operation. If the area is cramped or surrounded by flammable materials, the fire risk increases. A safe setup should always have open space around the unit.
Choose a Dry and Ventilated Area
A dry, clean, and well-ventilated place is ideal for inverter installation and daily use. Proper airflow helps control heat and supports long-term performance. It also lowers the chances of gas buildup in case of certain battery types.
Try to place the inverter:
- Away from direct sunlight
- Away from moisture or water leaks
- On a stable, flat surface
- In an area with enough ventilation
- Out of reach of children and pets
This kind of placement not only improves safety but also helps the inverter run more efficiently.
Do Not Block Airflow
Some homeowners place boxes, furniture, or other items around the inverter to hide it. That can block ventilation and trap heat. Heat buildup can reduce system life and affect backup efficiency over time. Always leave enough free space around the inverter for cooling.
3. Use Surge Protectors to Safeguard Appliances
Your inverter protects you during power cuts, but your appliances also need protection from voltage fluctuations. This is where surge protectors become useful. They help shield connected devices from sudden voltage spikes that can damage electronics.
Why Surge Protection Matters
Voltage spikes can happen during:
- Power restoration after an outage
- Sudden grid fluctuation
- Lightning-related disturbances
- Faulty internal wiring
These spikes may harm sensitive devices such as TVs, computers, Wi-Fi routers, chargers, and modern kitchen appliances. Using surge protectors adds another layer of electrical safety to your home’s power setup.
Protect Expensive and Sensitive Devices
A surge protector is especially useful for appliances that contain electronic circuits. Even a short spike can reduce their lifespan or cause complete failure. When paired with a properly maintained inverter, surge protection helps preserve appliance health and supports better long-term performance.
Devices that should be protected include:
- LED TV
- Desktop computer
- Laptop chargers
- Wi-Fi router
- Gaming console
- Smart home devices
Support a Stable Backup Setup
A good backup system is not just about keeping the lights on. It is about ensuring the power delivered to your home appliances is safe. Surge protectors help create a more stable and reliable backup environment, especially in areas where voltage fluctuation is common.
Simple Habits That Improve Inverter Efficiency
Daily and monthly care can keep your inverter system in better shape for years. Along with battery care, safe placement, and surge protection, follow these practical habits:
- Do not overload the inverter with heavy appliances
- Check wiring and terminals regularly
- Keep the inverter area dust-free
- Listen for unusual sounds or warning alarms
- Schedule professional servicing if performance drops
These small steps improve battery maintenance, strengthen electrical safety, and help maintain strong backup efficiency throughout the year.
When to Seek Professional Help
Connecting a home inverter may look simple at first, but some situations require a trained professional. If your setup involves complex wiring, unclear load requirements, or repeated problems after installation, calling an expert electrician is the safest choice. This not only protects your inverter system but also improves electrical safety for your home and appliances.
Complex Wiring Setups Need Expert Handling
Not every home has a simple wiring layout. Some houses have multiple circuits, heavy appliance connections, old wiring, or mixed power backup points. In these cases, a wrong connection can lead to short circuits, overload, or poor inverter performance. A professional with experience in inverter installation knows how to handle wiring safely, select appropriate connection points, and ensure the backup system operates smoothly during a power cut.
Load Calculation and Compatibility Can Be Confusing
Many homeowners are unsure about how much load their inverter can handle. This is a common issue. If you connect too many appliances without proper planning, the inverter may trip, overheat, or deliver weak backup. A trained technician can calculate the total power requirement, check battery compatibility, and confirm whether your inverter is suitable for your home needs. This step is important for both performance and long-term inverter maintenance.
Persistent Issues After Installation Should Not Be Ignored
If your inverter keeps beeping, does not charge properly, gives low backup, or shuts down without reason, do not ignore these signs. Repeated issues often point to wiring faults, battery problems, or setup mistakes that need professional attention. Trying random fixes on your own may make the problem worse. A qualified electrician can inspect the system, identify the root cause, and restore safe operation.
In short, getting professional help is not a weakness. It is a smart step when safety, system reliability, and proper performance matter most.
Conclusion: Reliable Power Backup System
Connecting an inverter at home is not just about joining wires and switching the system on. It is about building a safe and reliable home power backup setup that works when you need it most. From choosing a dry, well-ventilated location to making the correct battery connection, linking the inverter to the main power supply, testing the setup, and completing the right configuration, every step plays an important role in overall performance.
At the same time, electrical safety should always come first. Turning off the main power, using proper tools, checking polarity, avoiding overload, and using quality cables can prevent damage and reduce risk. Once the system is installed, regular inverter maintenance becomes just as important. Clean terminals, timely battery checks, and proper ventilation can improve efficiency, protect battery life, and help your inverter deliver steady backup for years.
A little extra care during installation and daily use can save you from bigger problems later. Follow the right steps, stay safety-focused, and your inverter system will serve as a dependable power backup solution for your home.
FAQ
-
Can I connect an inverter without turning off the main power?
Always turn off the main supply first for safety.
-
How do I know which battery terminal is positive or negative?
Check the markings. The battery will show + and – symbols.
-
Where should I place my home inverter?
Place it in a dry, ventilated area away from heat and moisture.
-
Can I run all home appliances on one inverter?
Connect only the appliances your inverter can handle safely.
-
What happens if battery polarity is wrong?
It can damage the inverter and create a safety risk.
-
Do I need thick cables for inverter connection?
Proper cables support safe power flow and better performance.
-
Why is ventilation important for an inverter setup?
It helps control heat and supports battery safety and inverter life.
-
When should I call an electrician for inverter installation?
Call a professional if wiring seems complex or the inverter is not working properly.
I am an electrical engineer and also a blogger. I write informative blog posts on topics related to electrical and electronics engineering. If you are interested in these topics, you are welcome to my site to read these articles.